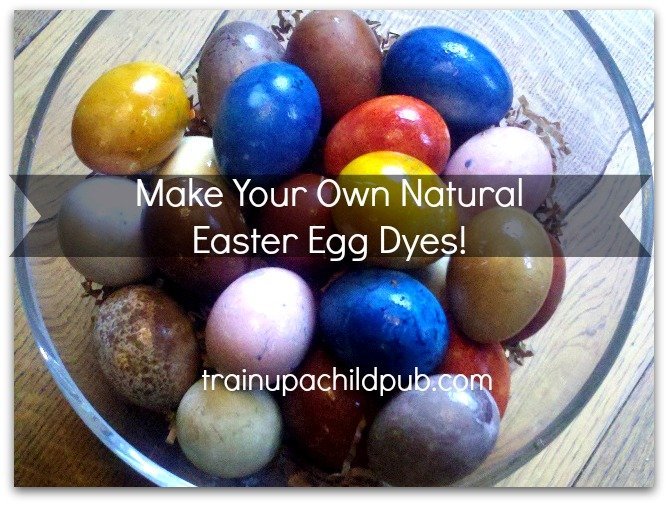
How to Make Your Own Natural Easter Egg Dyes!
Did you know that you can make your own natural Easter egg dyes… with items you probably have right now in your kitchen?
Although it’s never been the main event at Easter, our family has always enjoyed dying, hiding, and finding Easter eggs. Because what we are celebrating at Easter is the death and resurrection of Jesus, we often did the egg-hiding and finding part on another day. When the kids were small, they loved the neon colors that you got from the grocery store packages of Easter egg dyes. But what adventure is there in doing that?! One year I thought we should ditch the store-bought dyes and figure out how to make our own natural Easter egg dyes. And it was so easy and the colors turned out so beautiful, I was all in after that.
It started with the Chinese
Did you know that thousands of years ago, the ancient Chinese were already dyeing fabric? In fact, people from the past have used everything from ground insects to tea to make dyes. And you can do the same thing – but hopefully not from ground insects!
So how about creating your own natural dyes this Easter, instead of buying those pre-packaged egg-dye kits this year. You can get some science and history in at the same time, too. (And you know how I love to get as much in a lesson as possible!
Experimenting with various vegetables and spices and turning out eggs that are one-of-a-kind is a great hands-on, multi-age project. And combining the project with a little history and science allows you to integrate subjects and cover more ground than you would be studying all these things in isolation. Integrating subjects with a fun, hands-on project is a great way to bring your kids’ education to life and save enough time to get a few other things on your list done. Win-win!
How to make your own natural Easter egg dyes – the ingredients for the dyes
You probably have everything you need in your refrigerator and pantry already.
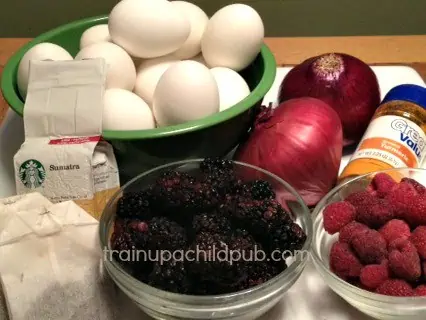
In the picture below are eggs, coffee, red onions, turmeric, raspberries, tea bags, and blackberries. You’ll also need some white vinegar, about 12-18 uncooked eggs, and about four smallish saucepans.
1. Gather what you are going to use to make the dyes.
The items we used are pictured above. (We also had to go to the store to get red cabbage to get a bluer-blue, so add that one.) Here is a list of what we used and the color dye that each material made:
- yellow onion skins: dark red
- red onion skins: purplish-red
- coffee: light to dark brown
- tea: light tan/golden brown
- spinach: light green
- turmeric (spice): bright yellow
- red cabbage: bright blue
- raspberries: light pink
You can use the ones above, or other things in your kitchen. Be inventive! Try some other spices, grass, flower petals, and other items you might have outside – with one crucial caveat:
Check and make sure that nothing is poisonous, please!
You would not want to touch or have your children touch plant parts that are poisonous, and you certainly would not want to put anything poisonous in your cookware. If you do not have a thorough field guide to your local plant life, just stick to vegetables and spices to be on the safe side.
You will need at least four small saucepans. (Smaller pans don’t require so much dye material.)
Depending upon how many eggs you would like to dye and how much material you have – again, I recommend at least 12-18 uncooked white eggs. It seems over the years that some eggs absorb dye better than others.
IMPORTANT NOTE: Authorities say eggs are not safe to eat if they have been out of the fridge more than two hours after cooking, so keep track of this unless you aren’t going to eat them.
2. Make the dyes for your Easter eggs.
-
- First, chop your veggies/skins and mash your berries. Put a cup or more of your dying material in each saucepan with the uncooked egg(s). If you’re using spices, you can experiment with the amount you need, but more is usually better. The typical four-burner stove allows four saucepans/dye colors to be done at one time.
-
- Secondly, measure about two cups of water – or just enough to cover the egg(s) and add that.
-
- Then add one tablespoon of white vinegar for each cup of water. Stir it.
3. Boil the eggs with the dye material and vinegar for 20 minutes and then turn the heat off or remove the pan from the burner.
-
- Check the color of the eggs. Leave them in the water longer or add more dying material if you would like your eggs to have a deeper color.
-
- You can even leave the eggs in the water overnight if you refrigerate the pan with the water and the eggs. (Cool the pan before putting it in your fridge or put a towel under it.)
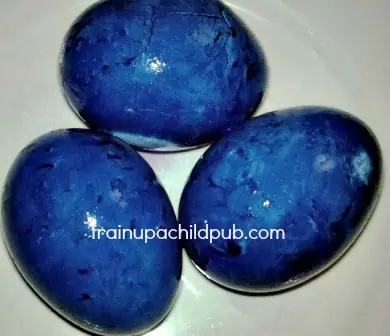
Leaving three eggs in red cabbage/water in the fridge overnight resulted in the gorgeous blue pictured below!
Another Method to make dyes.
Alternatively, you can also use the procedure above but without cooking the eggs until you have boiled the material for an hour and then strained it before putting the eggs in to boil.
Once the dyeing material has been boiled and removed by straining, use the water to boil the raw eggs for 20 minutes. This probably results in a more solid, uniform color, rather than the “textural” look of our eggs. I kind of like the more textural look.
I have never tried this method of making the dye first. Perhaps I was too impatient to boil the dye material for an hour. Maybe this year I’ll try it that way.
While You are Waiting
While you are waiting for the eggs to cook/dye to take, you might read and talk about the history of dye creation. Here are a couple of links to get you started:
- Dye Facts for Kids (History, Science)
- How to make different dyes, including ink (Science/history)
- Homemade Silk (from Silkworms) and how it’s dyed (Science/history)
- The famous “Silk Road” trading route, linking the cultures of Asia, the Middle East, and Europe (History/geography)
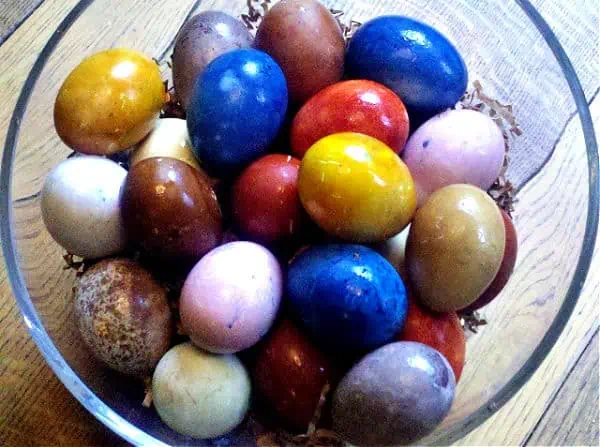
The Results!
When you are done cooking the eggs and if you are happy with their color, remove them from the dye water, gently pat them dry, and refrigerate. The egg carton they came in is a perfect place to keep them. When they have cooled, shine them up with a little vegetable oil to bring out the color.
Aren’t they beautiful?
Your turn!
If you’d like other hands-on projects to do with your kids that will help you bring your kids’ education to life, drop your email in the box below and get my free checklist: 25 Terrific Tips that will Transform your Christian Homeschool!
Happy Easter!
![]()


We have used natural Easter egg dyes before and they are so pretty! The colors are even more interesting when you use a mix of colored eggs. When we did it, we had chickens that laid white, brown, and green eggs. They turned out gorgeous!
Heidi, I bet your colored eggs were stunning! Thanks for visiting and commenting.